Chair repair.

We’re currently living near Edinburgh, Scotland where I am attending the Chippendale International School of Furniture, something that my wife and I had been planning for a while. This has been a dream come true for me and I’ve been drinking from the firehose since class started. I’m enrolled in the professional course that includes the following:

Timber identification & timber technology
Tool and Machinery induction
Sharpening
3D/Perspective drawing
The fundamentals of joinery
Woodturning
Cabinet Making
Carcass construction
How to make a dovetailed drawer & hang a cabinet door
Restoration/conservation of antique furniture
Steam bending & Laminating
Veneering techniques
Fretwork
Marquetry & Parquetry
Oyster & Boulle work
Inlaying (Brass, Ivory & Mother of Pearl)
Woodcarving
Gilding
Windsor chair making
Leatherwork
Finishing techniques (Oil, Wax, Shellac, Spray lacquer, Staining & Colour matching)
Business skills, pricing & customer care
Branding, PR & Marketing, and website development & management
Machinery maintenance
How to set up a workshop

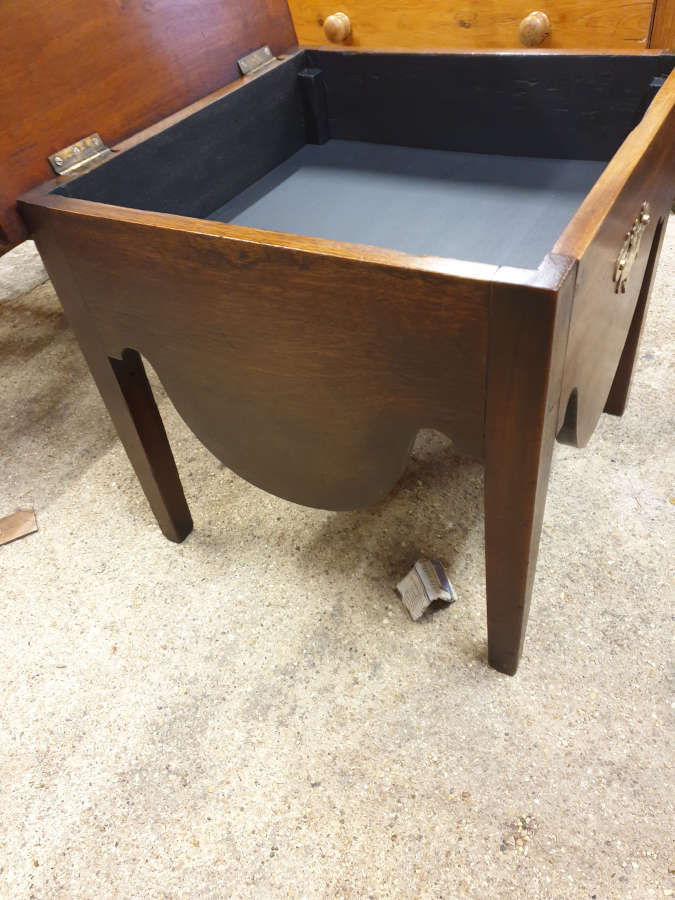
I didn’t realize it at the time, but furniture restoration and repair are the most challenging, fulfilling and enjoyable activities related to woodworking that I’ve found so far. That doesn’t mean I won’t find something else along the way but for now…

The school is also a working business that does restorations and repairs and I was given the opportunity to fix a chair that was brought in. At first, I was quite a bit nervous that I would screw something up that was irreparable but with Graham and Clare’s wonderful tutelage I was able to take this project on. Graham and Clare are the school’s repair and restoration experts and it is a very common sight to see them working on pieces. We all know that all we have to do is ask and we can take part in any repairs or restoration that comes in.

The chair is mahogany, 19th or early 20th century. with banding and inlay on the back splat.

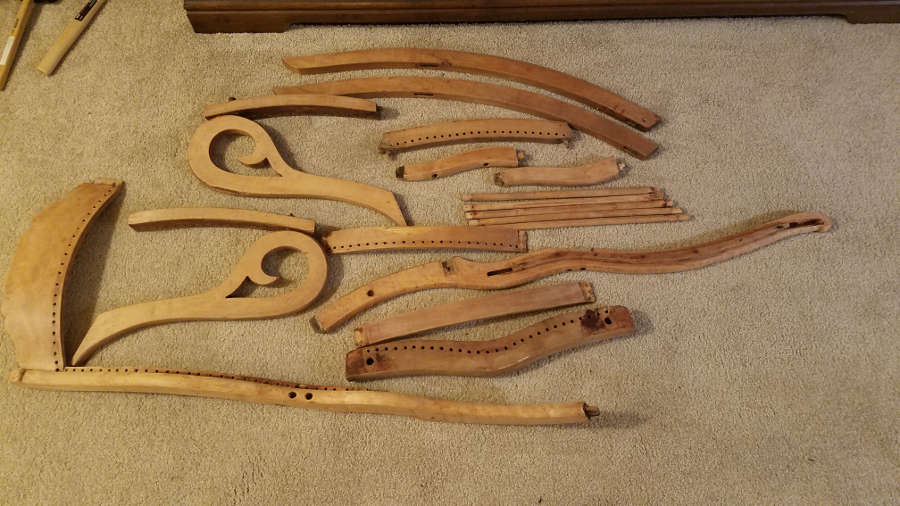
The front leg had been broken from the frame. The seat had been removed before it was brought in to the school.
A 13cm section had come away from the front frame and was still attached to the leg. The tenon from the front frame into the leg had snapped.
I was going to remove the frame section from the leg. Tried getting meths into the joint, but it did not loosen. After talking to Graham, I decided to leave it.

First thing I did was to remove the front frame to enable easier access to the damage.

First, I removed the screws for the corner blocks going into the back of the front portion of the frame.

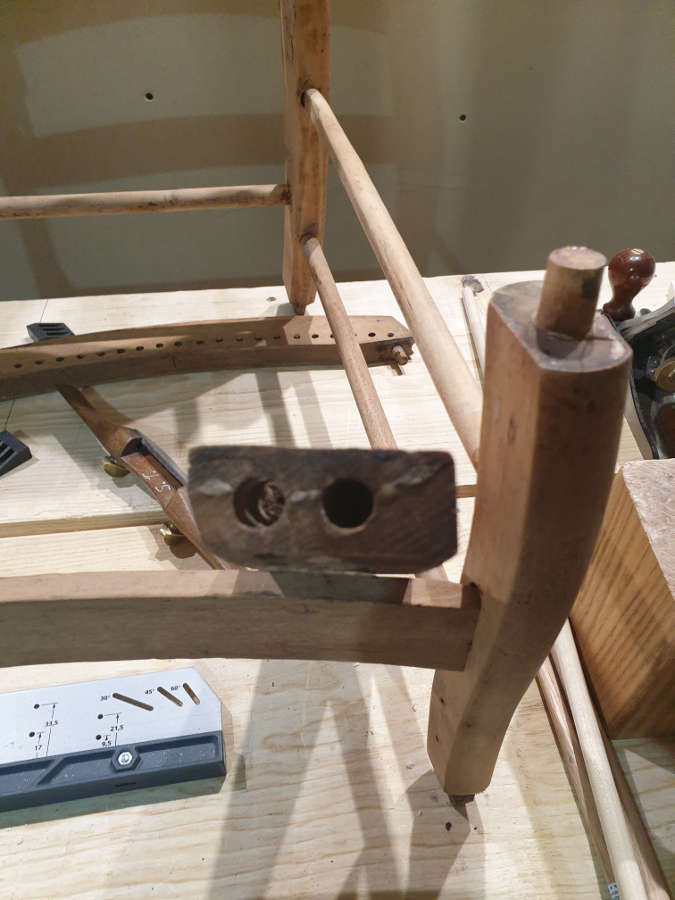
I was then able to use spreader clamps to slowly separate the front portion of the frame. Mild pressure with the clamps and a rocking motion allowed me to free the front leg from the tenon. I wasn’t at all sure I’d be able to do this, but as soon as I heard the tiny ‘snap‘ I knew that the tenon had separated from the leg. I wasn’t positive that it was a clean separation, though, until more of the tenon was exposed.

The next step was to create a mortise into the portion of the frame where the tenon snapped and then to remove the broken portion of the tenon from the leg.

I will create a mortise where the tenon snapped.
I’ll remove the broken tenon from this mortise.
New mortise created in the frame.
Mortise cleared out in the leg.
New loose tenon in the frame made from matching mahogany.
Shows the tenon being fit into the leg (the top of the picture).
Showing the loose tenon fit in the leg.

After the loose tenon had been glued and set overnight, I fit the front section to the rest of the frame to see how the break would come together.

I fiddled with the fit and tried to get all of the torn pieces to slide into their respective places, but the broken piece was still just a wee bit proud. Rather than remove any more material, I decided that once I had blended the pieces together you wouldn’t be able to tell.

The next step was to go ahead and glue this up and let it set overnight. I then took a bit of scrap mahogany and fit it to the opening.

This took a while.

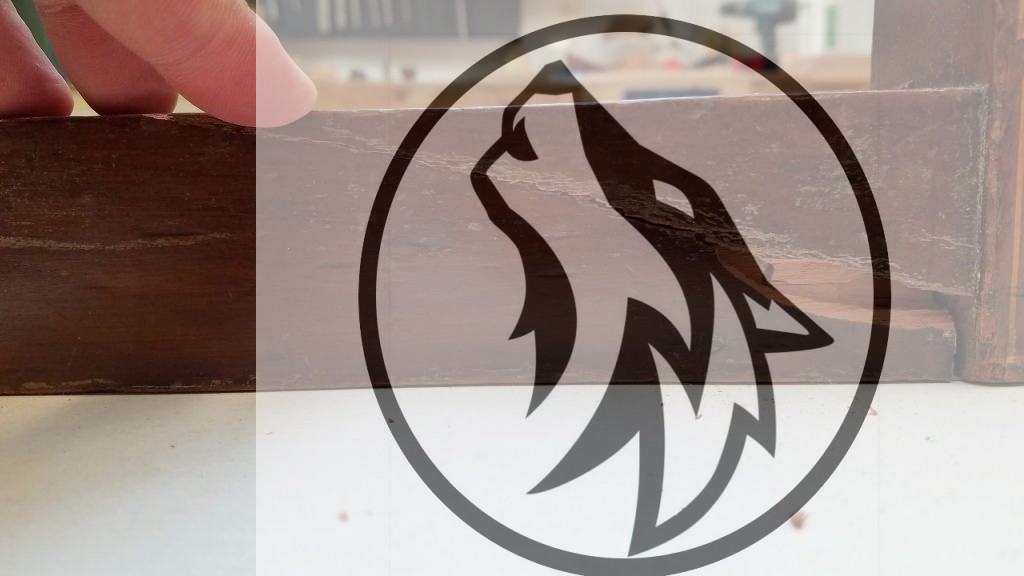
Next, I began colouring the new patch with water-based dies and sanded (exposed) old material to help blend.

I used Yellow, Van Dyke Brown, and Walnut.

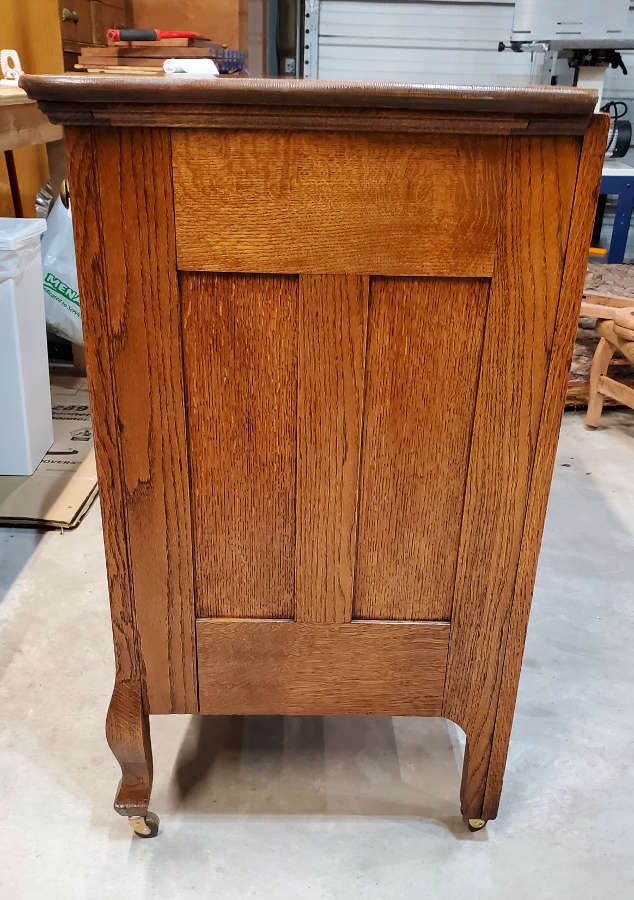
I then put 3 coats of shellac (dewaxed) on and blended with the french polish mouse (3 swipes with the mouse over the repair and into the old part of the frame).

The next day I roughed it up to take the shine off. Used some pigments with shellac and coloured wax to blend in and fill the smaller areas. Then White Wax over the repaired area and buff.

Veneer pins.

One of the most valuable things I’ve gained from being a student at the Chippendale International School of Furniture is access to antique, and even ancient, furniture that I’d only ever seen in books and online. We have visited homes and museums and have enjoyed access to furniture that I didn’t know existed. We have also had access outside of school to auctions and antique shops where I’ve fondled and caressed (not in a creepy way) beautiful antiques and vintage pieces of furniture for much longer than was appropriate.

Late 17th C. Oak Coffer

Late 18th C. George III Style ‘Chinese Chippendale’ Mahogany Urn Stand
Mid Century Modern Le Corbusier

I’ve been taught since I was young that when at any museum, or in the vicinity of delicate antiques, you ‘look but don’t touch‘ , so it’s been an amazing treat to be able to visit museums and homes and have that extra bit of access where you can touch the pieces, pick them up, turn them over and look at the underbelly because, in order to really understand how furniture was made, you have to look under, inside, and behind that piece. I first learned this from a blog, Pegs and Tails, that I’ve been following for a few years, and also from Peter Follansbee’s blog but since starting my furniture class I’ve had a chance to experience this first hand.

I’ve been able to see and help work on some wonderful pieces of furniture that have come in the School since I began my classes. From damaged chairs to cabinets, desks, dressers, and tables, they have all fascinated and intrigued me, but one particular moment that stands out to me is when a late 18th C. (around 1780) Italian table came in for repair/restoration. I’d not seen a piece like this before, but was immediately drawn to it because as soon as I started looking closely I could see so many wonderful and intriguing things about it.

Late 18th C. Italian table needing some TLC.
Closer view of the top.

But the one thing that caught my eye was when I saw some holes in the veneer and marquetry that didn’t look like normal wear and tear.

I knew that I remembered seeing this somewhere, so I went back to some blogs I follow and found it in the Pegs and Tails blog in a post called “A Thorny Subject” dated 15 Jan 2012. He talks about veneer pins, which were used in period veneer work. They were made of thin sheet steel and guillotined or sheared with a taper. The edges were sharp enough to cut fingers so they were made to cut through the veneer instead of wedging into it. I’ve not found any sheered veneer pins for sale today (only round), but it may just be that my Google-Fu skills are rusty.

Per the article, the veneer pins were often used on uncooperative veneer in corners, on either side of a split or joint, or anywhere the veneer refused to cooperate.

Some of the pin holes are circled.

This was one of those ‘Eureka’ moments for me and just drove home the fact that I’m intrigued by the methods and tools used by pre-industrial furniture makers and crafts people. I was fairly bouncing around the table, babbling like an idiot about these pin holes because it tied together things I’d read about to things I was able to experience. And quite often, making it real is the catalyst for education.

Repurposed Commode.

My wife and I were antiquing recently when I stumbled upon a piece of furniture that was familiar even though I don’t think I’d ever seen one in person before.

A piece of plywood replaced what was likely a wooden bottom with a hole cut in it to hold a pot.

I did remember where I’d seen a picture of one before so I hopped on Pegs and Tails, which is my go-to for antiques identification and restoration. I found this article that seems to support what I thought.

Very similar to the piece I was looking at.

So, it’s possible that the nice little “end table” with a hinged lid and storage inside, began its life as a Georgian Commode.

Late 19th C Empire Style Rocker Restoration Part 1

One of the first projects I’ve started working on since moving back to the US is a rocker I picked up at an antique shop. Normally, you don’t find a piece in this shape in an antique store, but it looked like someone wanted to have a go at it and then gave up. The caning had been removed and some of the paint (original dark red) had been removed, but other than that it was just in a sorry state.

Someone got started on this project but didn’t have the time or desire to finish it.
A previous repair.

As I went over this piece, I noticed some things that I would change when I rebuilt it. An example is the rockers, which split along the grain in several places. I’ve decided not to try to reuse these rockers, as I did some experimenting with glue-ups and looked at all the holes created by other repairs and figured it wasn’t worth it.

Another thing I decided to change is how the seat was put together. There were two dowels holding the sides to the front and back pieces of the seat. The side pieces were curved and they split in the short grain.

These side pieces of the seat split along the short grain at the edge.
A bit blurry, but you can see where it split through both dowel holes and then up through the top.

Other than that I didn’t see much that I wanted to change so I took the chair apart.

Once I had the chair apart (except for the top rail and the side piece that I think had been glued together with epoxy or similar) I stripped and cleaned the pieces so I could better evaluate each piece and the joinery.

This is when I found that the frame for the back caning had split into dozens of small pieces, so this will need to be replaced.

Next up in part 2 I make parts for a new seat frame.

Small Oak Serpentine Dresser

So, my glacial progress on these first restoration and repair projects has been a bit disheartening, to say the least, but I’m within spitting distance of finishing the small oak dresser, so here we go.

This is the 2nd project in a group of about a dozen that I’ll be working on in between my day job and getting my workshop insulated (which I will write about in another post). It is an oak dresser that originally came with a mirror. The mirror may be in the group of mirrors that I received with these projects, but I have not tried pairing them yet. The dresser is likely early 1900s or, less likely, late 1800s. The drawer fronts and top are solid oak and the interior is in good shape. The casters are original wood wheel and brass and the drawer hardware appears to be original as well.

Serpentine front small oak dresser. It’s in pretty good shape except for some burns, water stains, and other discolouring.

The dresser was not in bad shape but required some work done to the damaged top, so I got out the card scrapers to remove the burns, then filled the shallow divots with shellac which I coloured to match the rest of the top. Some alcohol and a scrubber got out most of the rest. I then put a few coats of shellac and then some dark wax (Kingdom Restorations). Clare, a tutor at the Chippendale International School of Furniture used to say, “Dark wax can hide a plethora of sins.” In this case, it helps even the tone across the top.

I also needed to replace a damaged runner. This was the only “woodworking” needed for the project.

Damaged runner on the bottom.

I then cleaned out the corners of the panels of the frame and panel sides. This may seem like a nit-picky thing, but in this case, I wasn’t going for a heavily patinated look. Getting rid of the black gunk in the corners just sharpened the edges and “youngened” it up a bit.

I replaced the old casters with reproduction casters from Van Dykes Restorations. The new casters are beautifully made and all I needed to do was plug the old holes, then drill new holes for the new casters.

New caster wheels were just a wee bit larger than the old ones, but the larger wheels roll more smoothly over carpet or rugs. The new casters also have ball bearings – very nice.
This picture shows a hole that has been plugged and is ready to be drilled for the new caster.
This shows that on one of the back legs there was some separation between the different sections of the leg, so I used the glue squeeze out from the peg to put those back together.

While I was working on the casters I noticed that when they were making this dresser, they used a table saw or similar to cut the mortises for the side rails.

On this side you can see the kerf of the saw, so it looks like it took 2 passes to get the right width for this tenon.
For the two top short drawers, the saw just went the entire length.

After this I noticed that the stiles for the side panels were starting to separate so I cleaned the old hide glue out and cooked up a few ounces to re glue.

The hardware was not in horrible shape but a few of the bail pulls were either missing rosettes or the rosettes were damaged so I searched E-Bay and found some nice ones and also found some that I liked at Van Dyke’s Restorers. Even though I found some knobs there as well, I decided to keep the original.

Old knobs and new pulls.

One thing I didn’t replace (yet) is the missing escutcheons for the two top drawers. Why, I can’t even begin to say, except that brain farts are real.

I just have a few fiddly bits to finish up like the escutcheons and runner blocks for the drawers to keep them from jamming, but other than that this has turned out to be a very pretty and usable piece of furniture.

Don’t look at the missing escutcheons!
Before re gluing the sides.
Top turned out beautifully. The cigarette burns and other stains came out very well. There is one divot that I didn’t fill because it was wide but shallow and I figured it was not very noticeable. If I had this to do over again, I might put the time into filling and colouring it, but probably not.

I’ll probably take a look at some brighter, shinier hardware for this one, but I doubt that I’ll go with it. I like the darker hardware on this. I will probably post some pictures with the brighter stuff though, just for comparison.

Slant top secretaire restoration. Part 1

This is a quick post to introduce one of my current projects. This one is a Victorian slant top secretaire that I have recently started. It has some beautiful oak veneer as well as solid pieces that need some love. There will be quite a bit of small repairs to the finish, so some color matching. But the part that I’m excited about is the glass for the doors, as I have not had to replace this kind of glass before. So I’ve been busy researching this and finding out what my options are (find original glass or have it made). Anyway, it’s going to be a fun project, and I’ll be posting about my progress soon.

Slant top secretaire.
The gallery is in good shape and looks like it just needs a good cleaning.
I have it apart now and am going over all the pieces, cleaning and assessing their state.

Oak Coffer Observations Part 2.5

I was talking about the legs of our coffer and how they had been worn down and cut down over the centuries, and I wanted to show just how much that is.

This first is our coffer with its stubby – or shapely – legs. You can see that the front legs are uneven.

And below you can see that the back legs are quite a bit shorter than the front.

Now I have a couple of beautiful examples of coffers (just as old as ours) with nice long and even legs. The following pictures are all from Peter Bunting Antiques.

17th century coffer with a paneled top and nice long legs and relatively little moisture damage.
17th century coffer with some long legs that do show moisture damage. Conservation will keep these from deteriorating any further.
A beautiful 16th century 6 plank coffer. You can see the back right leg has a repair, but still has its length.

I think this says quite a lot about the homes that our coffer lived in for a good portion of its life. Dirt floors covered with loose rush (or woven rush) were common in England up until the 18th century (and maybe later). In fact, one of the reasons for the low stretcher on the front of early chairs (back stools) was so the person could put their feet on them and not have to leave them in the wet and dirty rush covering the floors. When we see these chairs with the stretcher almost touching the floor, this is only after the legs have been rotted and chopped off.

Back on topic. I’ve added these clues to my list and will talk about the clues I found in the newspaper lining next.