Oak Coffer Observations, Part Two

You can find the first part of my observations here. I’ve been interested in oak coffers for quite some time. I think it was Peter Follansbee who initially made me aware of them quite a few years ago. While researching green woodworking I came across Mr Follansbee’s website where he talks about early American furniture makers, furniture-making tools, and processes. His website is always informative, inspirational, and extremely valuable when it comes to green woodworking, 17th-century furniture making, tools, and bird watching.

The oak coffer was made almost exclusively with mortise and tenon joinery, although there are a few exceptions to this where dovetails or butted and nailed edges were used. Some later versions were made of walnut and other local wood, but by and large, the earliest coffers were oak and made with mortise and tenon joinery. This put them under the strict control of the Joiners Guild (members of the “Mystery of the Joyners”). This meant that within the City of London (and to varying degrees, elsewhere in England) from the 15th to 17th centuries, the guild had the authority to search workshops. These inspectors would ensure that only members of the guild were making joined products and that the craftsmen who were members followed the guild procedures and processes. The Carpenters and Turners also had guilds, and over the centuries they competed and merged with the others. The history of the guilds in Europe and the UK is fascinating, and I’m sure I’ll go down that rabbit hole and write about it sometime in the near future.

You have been warned.

I had been looking at coffers for quite a while and had my eye on several. One of the first coffers that I had a good close look at was at a Lyon and Turnbull auction in Edinburgh in Nov 2018. This was my first good up-close look at a 17th-century oak coffer, and I was over the moon. My oh so patient wife watched me make a spectacle of myself as I bounced from piece to piece at that viewing, but the 17th-century pieces stole the show for me. Over the next year though, I’d see quite a few other coffers, newer and older and in better and worse shape, and so I ended up being able to make somewhat intelligent comparisons.

The first oak coffer I had a chance to look at up close and personal was at a Lyon and Turnbull auction in Edinburgh.
This piece ended up selling for £375

After almost a year in Scotland and then in England, looking at hundreds (if not thousands) of beautiful old pieces of furniture, and more specifically, oak coffers, we finally found one that fit our needs/desires. While living in March, Cambridgeshire in the UK, we purchased an oak coffer from the Risby Barn Antique Centre near Bury St. Edmunds. Since then, I’ve been slowly going over it to see how it was made, how it had been repaired, where it had lived, and trying to verify its age.

The oak coffer I’ve been studying.

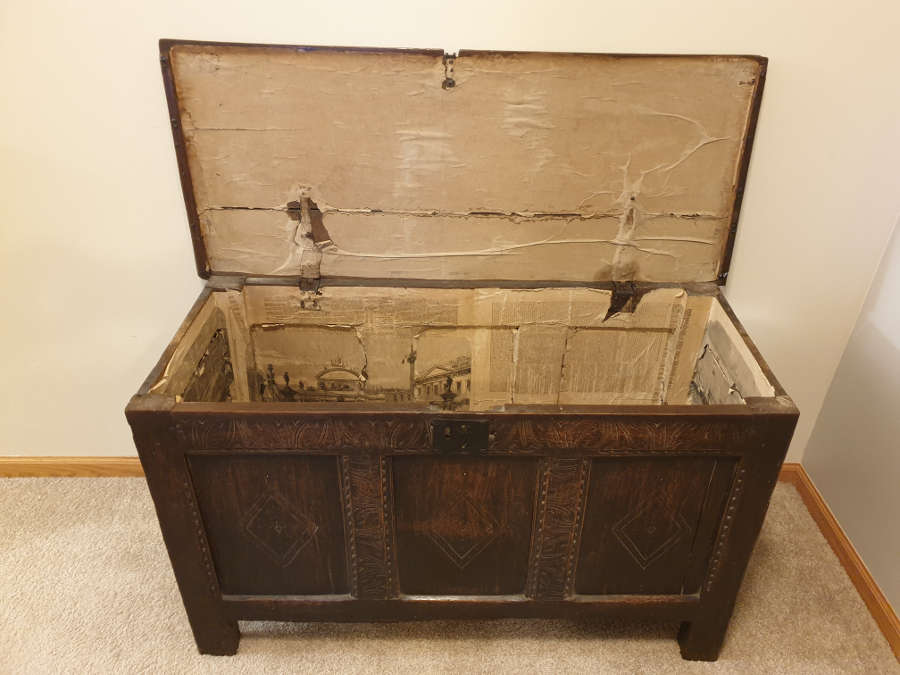
We had allotted up to a certain amount for our purchase, but this coffer that we decided on was well below that. It was sold as an “Early 17th-century plank top oak coffer” and even though I’d seen many of the same age in better condition, this one caught my eye because of the repairs and the newspaper that was used to line the interior. I decided on this one not just because of its beauty but also because of the story it would tell, which to me, is just as important.

As I mentioned, the newspaper lining was one of the first things I noticed that set this one apart from most of the others I’d seen. In fact, after going over all of my pictures I don’t believe I had seen any other ones with newspaper lining so, BIG WIN. There isn’t anything about the paper lining that adds to the monetary value of the piece and more likely, it decreased the value by hiding the interior. But for me, it provides clues to the history of the piece, which is valuable. I’m going to write specifically about the paper lining in a future post, but for this post I’m going to concentrate on the legs and feet and those repairs.

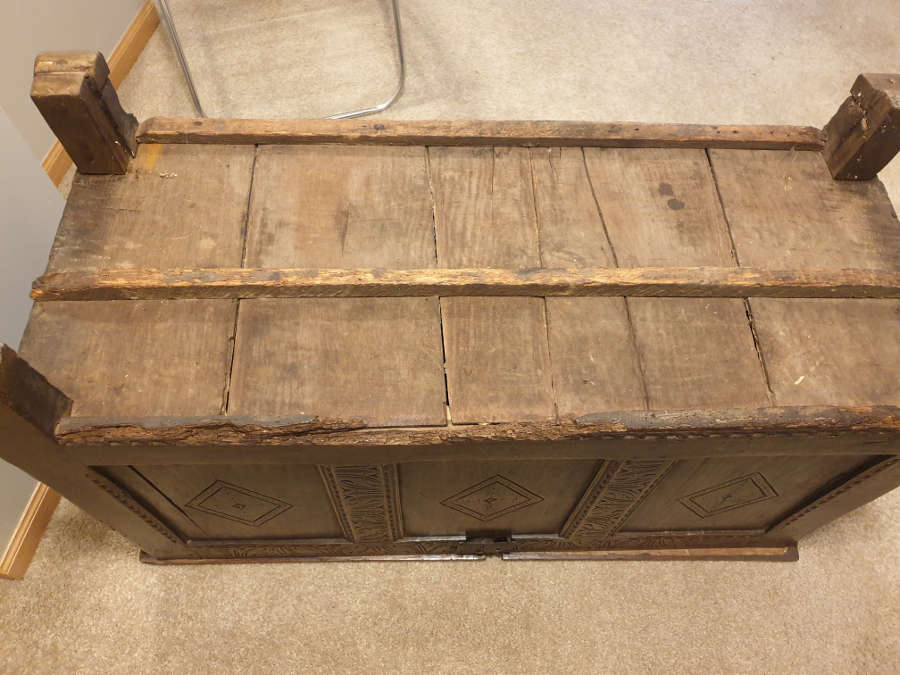
The legs are also the stiles of the panels and house the mortises for the side and front rails. The end grain of the feet have been soaking up any and all moisture on the floors for more than 300 years, and it is quite likely that the first several homes that this piece lived in had dirt floors.

Water and insect damage are visible in this picture.

The back legs have been damaged the most and after reading a bit about this it does make sense.

The back legs would have been up against an outside wall of either stone or wattle and daub (and no insulation or moisture barrier) so moisture and even standing water would not have been uncommon.

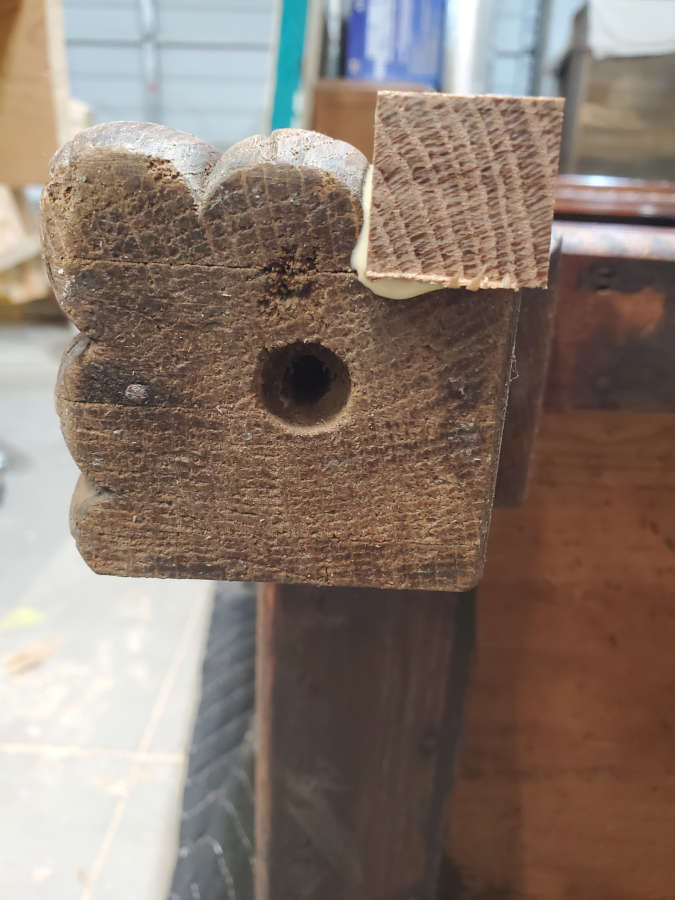
In the case of our coffer, the legs had probably deteriorated to the point that the person who repaired it simply had to cut them back to a point where they were not as rotted. That person then added two sections of new wood. The one behind the leg has the grain running vertically. This piece is likely to stabilize and strengthen the leg. The second section was on the bottom of the foot and had the grain running horizontally, so it would not wick as much moisture. This repair may have happened a century or so after it was built, but the next picture shows that the spliced piece behind the leg, as well as the block attached to the bottom, have been worn at an angle. This could mean one of two things. First, it might be that the person who added the repairs made the back legs too long and then cut the back legs at an angle to meet the front legs. I don’t think this is the case, but I could be wrong…Nah, I’m not wrong.

Back foot repairs at an angle.

I think what really happened here is that after the back feet were repaired, the front feet also experienced deterioration that resulted in them losing a bit off the ends over the centuries. As the front feet wore down, the back feet wore at an angle to compensate. One other thing I’ve noticed is that the vertical piece that was scabbed onto the back of the leg may not be nearly as old as the horizontal piece added to the end of the foot. This because that piece doesn’t show any of the deterioration that you would expect if it had been soaking up moisture for several centuries.

Not a great picture, but you can see that the end grain of the scabbed piece is not deteriorated.

This possibly means that the scabbed piece was added after the coffer moved to a home with non-dirt floors, thereby not wicking up as much moisture over the next hundred or so years.

For the next part of my observations, I’ll talk about the newspaper lining and how that fits into the piece’s history.

Slant top secretaire restoration, Part 5

So, even with all the physical repairs that I’ve done on this piece, the portion of the restoration that has taken the most time and required the most precision is the hardware. I have replaced the slant top hinges, the slant top lock, the large drawer locks, the front door hinges, and the front door lock. The front door hinges took the longest of anything because they require the most accuracy, with the slant top hinges a close 2nd.

When I started this project, I wasn’t even sure that I’d be able to find the hardware I was looking for. I began my search on eBay and found some great hardware (for future projects), but nothing that I could use on this project. I then went to Van Dykes Restorers and found some very good possibilities for the hinges, but eventually moved on to Hardware of the Past (before they closed shop) for the escutcheons and the lock for the slant top.

Slant top lock replacement.
New lock in situ.

The hinges for the slant top were worrisome on many levels for me because not only was I repairing damage from previous repairs, but I then needed to fit and mount new hinges.

Can’t really see it from this angle, but the damage to the slant top meant that the hinge screws were about to tear out.

I had thought about leaving the mortises for the hinges and just trying to find a hinge the same size, but that was a no-go. There had been quite a few repairs and I wanted to make sure that my repairs were on solid ground, so I mortised out a lot of the previous repairs and then laminated in patches for the hinges as well as the damage to the edge of the lid.

That looks a right mess there.

I wrestled with the idea of laminating a strip all the way across the lid, but that would have been an unnecessary removal of a lot of original material.

Fitting the hinges.
Waiting for the correct (flat head) screws and a couple coats of shellac.

I then moved on to the locks for the large drawers. After the comedy that was me trying to remove the original lock from the lid, the drawers were very straightforward.

Replacement locks for the large drawers.

The front doors were the most fiddly of the hardware because I didn’t use the hinges that were there (they weren’t the originals), the doors hadn’t been hung correctly, and I had to repair some significant damage to one of the doors where a hinge had been torn off.

Some damage to the door.
Wash, rinse, and repeat for the other door.
After fitting and coloring.

I mortised the hinges into the doors and into the sides and the doors now close with a wonderfully small and uniform gap all around and the astragal covers the gap between the doors beautifully. I don’t have a picture of that yet, but it’s coming.

After all of that fiddly stuff, the podiatrist is finally in and will fix my lady’s broken toe.

Tune in next time. Same Bat Time. Same Bat Channel.

Youngsters, young adults and woodworking.

A while back we visited the grandbabies and I was delighted to find that both of my granddaughters were interested in learning to use an axe and carving knife. I wasn’t sure how to start, so I began with the basics of showing them how to use an axe, how to hold it, how to stand, how to swing the axe, and the safety involved in each step. I took each step relatively slowly and quickly found that I needed to vary the speed of my instruction between the two. For my oldest granddaughter, this seemed to be more of a curiosity, a new thing for her to try, learn, and then store away for later use. On the other hand, my younger granddaughter was eager to soak up everything about the axe, the knives, the wood, safety, how to hold each tool correctly, and how to position the tools and wood. She was also the one who used the tools with either hand, just like I do. I have learned to use my hand tools with either hand out of necessity because I have arthritis in my shoulders and need to be able to switch up as needed. To see my grandbaby do the same thing, and to be such a quick study at it was very exciting and I was eager to continue to teach her in this fashion.

Even though their hands are much smaller, they both surprised me by being able to handle the axe very well. This helped me to realize something I had been very wrong about; that children can use some potentially dangerous tools under proper supervision. I had watched and read about other woodworkers teaching their children/grandchildren how to use power tools and hand tools and my reaction had always ranged from, “interesting” to “I don’t think so“, so when I got back home after our visit I realized that my view on this had changed. Not significantly, but enough that I could see the value in teaching younger people how to safely use tools. I think it dates me when I say that when I grew up, I learned how to use tools by hurting myself and then not doing that again. I have a responsibility to make sure that my grandbabies do not have to learn in this inefficient and unnecessarily dangerous way.

Plus, it’s fun and a wonderful way for us to spend time together.

Small elm bookshelf

Sometimes you reach a point where you feel you’ve lost all forward momentum and are stagnating. You might have a half dozen (or more) projects staring you in the face but you can’t seem to make any progress. You blame distractions, your day job, the home remodel, and any number of other possible excuses, but really you’ve hit one of your valleys.

In my case, I needed a quick win. A little project that I could get finished relatively quickly so I could then use that dopamine rush to carry me through to the rest of my projects.

And this small bookshelf was the perfect project for that.

An elm bookshelf that needs a bit of help.
The top shelf had most of the stain and finish worn off and some fairly deep scratches.
The second shelf had a paint stain and also had the stain and finish worn off.
The bottom two shelves were in the best shape.

I started by taking it all apart, which was pretty quick and easy. There were screws holding the piece together and then dowels that ran along the sides. The dowels slid out quite easily, and then the legs/stiles unscrewed from the shelves.

Elm grain is some of the most beautiful of all woods in my opinion.
The feathery look makes the experience tactile. You just have to touch it.

Once I had it apart I stripped each piece. I don’t normally strip a piece I’m working on because you lose the color and patina that many people look for in antiques. In this case, I decided to strip it because the majority of the surfaces were in bad shape and had already lost their patina and color.

I then assessed the pieces and decided that every surface needed to be sanded to get past the damage. And again, I normally don’t sand a piece I’m restoring but in this case it was already so far gone that sanding was necessary. And I’m glad I did because as I got past all of the damage and discoloration I reached some beautiful grain.

After stripping and sanding I cleaned everything with alcohol and instead of shellac, I used pure tung oil with citrus solvent. Normally I’ll use shellac, and then wax to match the color of the repaired parts and sections to the original. In this case, there was no original surface remaining so I went with

The bookshelf after 2 coats of tung oil.

***Edit. This is the second version of this post because I had to restore the website from a backup and lost the 2nd half of this post.

I was going to keep this piece in the shop for a bit longer because there is some color variation that I could even out with a couple coats of dark wax, but I needed this project as a quick win. I needed it for the dopamine rush that I can use to continue on with my other projects. Plus we really needed a bookshelf for all of our cookbooks.

The top shelf looking good with its beautiful grain.
The second shelf with no more paint stain. Also showing its beautiful feathery grain.

My next post will probably be on the small elm stand.